
 |
| Home Ģ Reviews Ģ Forums Ģ News 2015 Ģ 2013 Ģ 2012 Ģ 2009 Ģ 2008 Ģ 2007 Ģ 2006 Ģ 2005 Ģ 2004 RSS Feeds Ģ FOV Factor Table Ģ Sensor Sizes | Definitions: A-D Ģ E-H Ģ I-L Ģ M-P Ģ Q-U Ģ V-Z | Sitemap Articles Ģ Archived Websites (Pre-DigitalDingus): D100 Lounge Ģ E-10 Club | Contact |
| Exposure by Alien Skin |
| Exposure \\ Tone August 7, 2006 |
| Exposure Introduction Ģ Settings Ģ Preview Window Ģ Color Ģ Tone Focus Ģ Grain Ģ System Requirements Ģ Exposure Conclusion
|
Defining the characteristics of the tonal qualities of your image, can be important to convey a particular effect or mood. Exposure allows a vast amount of adjustment options for you. Exposure \\ Tone
The Interactive Curve Graph You'll be familiar with what I call the "Interactive Curve Graph". Photoshop CS2 (and a few of the previous versions I believe) has this as well. Instead of just plugging in numbers, photographers might be more inclined to "see" their curves on a visual scale. In many cases, it actually makes editing quicker. There are also "curve points" which are areas pre-defined from film settings, but you can create your own points by just starting at an area along the curve and dragging your mouse accordingly. Several different points can be created on the curve graph. You might also take note these settings can apply to the entire RGB curve, or you can select individual channels. Input / Ouput The Input and Output boxes accept numbers 0 to 100. These coordinates are the same as moving your mouse and creating a point on the curve graph. These two boxes also help you understand the correlations between the graph and the numbers you see. Black / Gray / White Point Select To the right of the Input / Output boxes, you'll see three icons which look like eyedroppers. The first eyedropper will make everything black from the image you select of a particular color. The second eyedropper is gray, and the third is white. So, for example, if you have an image that is mostly white, and you select the black eyedropper on a part of the image that is white, you're going to have an image that is mostly black, because it will make everything black that is the same color as you selected. Some photographers might find this useful, some may not. It could be used for high-contrast images if you're fluent in using this kind of tool, and may become useful for a particular color you want to filter out. Contrast Adjustments And More The lower 1/3 of the panel you can see there are four additional adjustments (on a scale of 0 to 100) you can make to your images:
Save, Load, or Reset Finally, you have the option to save your curve settings, load them, or reset them entirely. This is another great feature Alien Skin has provided and truly makes this a professional application.
|
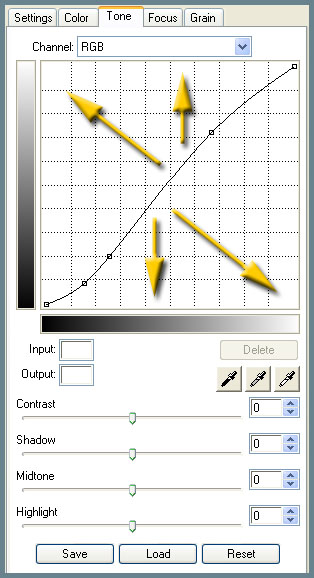 The tone adjustment layout you see on your left is the same for both film formats (B/W and Color). The added arrows indicate some of the possible directions taken if a mouse is used for moving the points on the interactive tone graph.
| Home Ģ Reviews Ģ Forums Ģ News 2015 Ģ 2013 Ģ 2012 Ģ 2009 Ģ 2008 Ģ 2007 Ģ 2006 Ģ 2005 Ģ 2004 RSS Feeds Ģ FOV Factor Table Ģ Sensor Sizes | Definitions: A-D Ģ E-H Ģ I-L Ģ M-P Ģ Q-U Ģ V-Z | Sitemap Articles Ģ Archived Websites (Pre-DigitalDingus): D100 Lounge Ģ E-10 Club | Contact |