
12:40:23 PM
| Home � Reviews � Forums � News 2015 � 2013 � 2012 � 2009 � 2008 � 2007 � 2006 � 2005 � 2004 RSS Feeds � FOV Factor Table � Sensor Sizes | Definitions: A-D � E-H � I-L � M-P � Q-U � V-Z | Sitemap Articles � Archived Websites (Pre-DigitalDingus): D100 Lounge � E-10 Club | Contact |
| Macally PHR-250OTG (Using Fujitsu 80GB 2.5" 5400RPM 8MB Cache HDD) |
| Removing The Back Cover / The 2.5" HDD Metal Plate |
| Introduction | External Overview & Prep |
Removing The Back Cover | Installing the Fujitsu MHV2080AH Installing The Software & Drivers | Conclusion
|
Charge The 250OTG Before you do anything, please grab the AC Adapter, and charge the 250OTG for 2-3 hours. THe 250OTG has an internal 1200mAh Lithium Ion (Li-Ion) battery, which permits you to transfer files without the need for the computer or notebook. During the charging stage, the 250OTG will have an "Orange-ish" blinking LED. Once the 250OTG is completely charged, the LED will be off completely. Removing The Back Cover You should have a small screwdriver available and some sort of white cloth or container so that when you unscrew the back cover, the screws will not be lost. The back cover is the one with the most buttons and holes in it. An image of it is on the previous page if you need to be sure. Once you remove the two screws (there will be one screw on each side of the main metal unit connected to the back cover), observe the following image:
"The plate is attached rather tight and firm to the case" Yes, it is. However, after removing the plate a few times, it does become less resistant. The plate has a tight fit because once the hard drive is attached, you do not want the plate to slide back and forth freely. Macally has made sure all potential points of compromise (the attaching of the 2.5" HDD to the plate, and the plate to the case) are very snug. "What about those two holes I see?" Those two holes you see as you are sliding the metal plate out, will eventually turn into 4 holes. These are the mounting holes which will be used for screwing the 2.5" HDD into the metal plate for a firm foundation. If you haven't noticed yet, there is a little plastic baggie with 4 long screws AND 2 of those really super small screws I have been talking about. The plastic baggie is taped to the area where your future 2.5" drive will go. I think macally included those 2 extra small screws because they were nice enough to foresee people like myself (and probably you) losing a screw here and there eventually in the future. On the next page, we will be installing the Fujitsu 2.5" HDD (MHV2080AH).
|
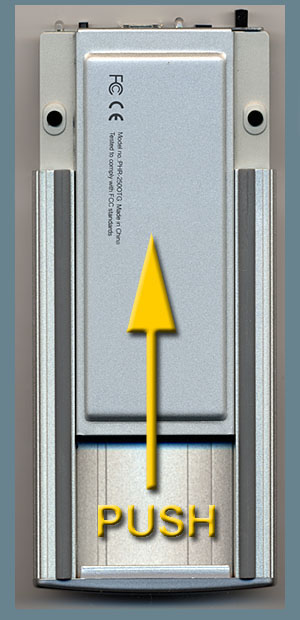 It is important that you PUSH slightly DOWNWARD and UP (up meaning towards the direction the plate needs to go--which is out the back end). Don't feel like you have to slide the HDD plate out all at once. Take your time. The plate is actually quite sturdy and firm, and is not a thin piece of metal, so it can withstand a good amount of pressure. However, don't assume it can replace the main house beam in your home.
| Home � Reviews � Forums � News 2015 � 2013 � 2012 � 2009 � 2008 � 2007 � 2006 � 2005 � 2004 RSS Feeds � FOV Factor Table � Sensor Sizes | Definitions: A-D � E-H � I-L � M-P � Q-U � V-Z | Sitemap Articles � Archived Websites (Pre-DigitalDingus): D100 Lounge � E-10 Club | Contact |