
| Home Ľ Reviews Ľ Forums Ľ News 2015 Ľ 2013 Ľ 2012 Ľ 2009 Ľ 2008 Ľ 2007 Ľ 2006 Ľ 2005 Ľ 2004 RSS Feeds Ľ FOV Factor Table Ľ Sensor Sizes | Definitions: A-D Ľ E-H Ľ I-L Ľ M-P Ľ Q-U Ľ V-Z | Sitemap Articles Ľ Archived Websites (Pre-DigitalDingus): D100 Lounge Ľ E-10 Club | Contact |
| Macally PHR-250OTG (Using Fujitsu 80GB 2.5" 5400RPM 8MB Cache HDD) |
| Setting Up The 250 OTG |
| Introduction | External Overview & Prep |
Removing The Back Cover | Installing the Fujitsu MHV2080AH Installing The Software & Drivers | Conclusion
|
Let's take a look at the outside of the enclosure itself. Below are images of the front and back sides of the 250OTG. You're probably thinking the face with the most "goodies" on it, is the front. Nope. The front is the one with the single LED.
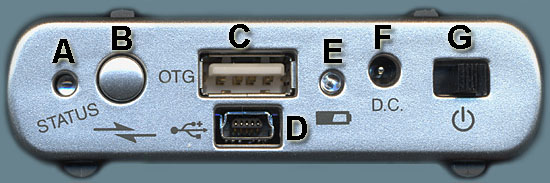
B) COPY/TRANSFER Button which initiates copy/stop copy of data files from a USBMS or PTP device C) Type "A" USB port, which is used to connect to a digital camera, media reader, etc. D) Mini-B USB port, which is used for connecting to your computer and for charging E) Orange LED to indicate charging status F) AC Adapter power jack G) Power switch

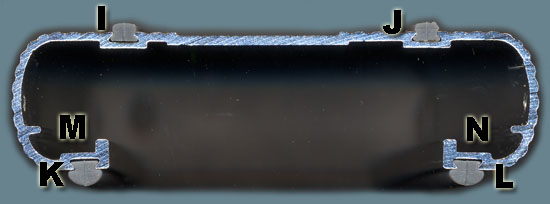
J) Top Anti-Slip Grip K) Bottom Anti-Slip Grip L) Bottom Anti-Slip Grip M) Support Plate Track N) Support Plate Track There are four rubber "Anti-Slip Grips" as I call them, which run parallel to the entire enclosure (two above and two below). Be confident in knowing the 250OTG will not be sliding around. Also, there are the two "tracks" which the Support Plate of the 250OTG slides on. Prepping For The Installation Usually, the software and drivers are installed first when installing hardware, but in this case, we need to do a few things beforehand, such as:
1) Charge the 250OTG for 2-3 hours
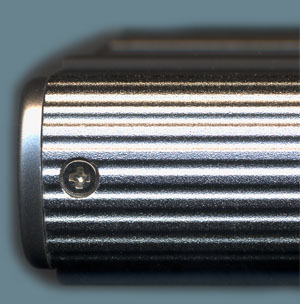
1) Be sure you have a small enough "Philips" screwdriver to remove the 2 screws from the back plate cover. 2) Find a small white towel or cloth to place the 250OTG on. The reason for the white towel, is because the two screws you will remove from the back plate, are VERY SMALL. They can EASILY be lost and never found again. At the least, you'll be grabbing a magnifying glass and using it for a few hours, while kicking yourself that you didn't listen to that guy on that website. The two screws are also not as long as one would think, and when I removed one, it almost fell to the floor if it wasn't for my screwdriver being magnetized (interestingly enough, I didn't even know it was, until now). If you possibly just can't find a white cloth (because white is much easier to see small things on it), then try to find something where you can place the 250OTG in such as a plastic Tupperware bowl. Believe me, you'll thank me later on.
|
| Home Ľ Reviews Ľ Forums Ľ News 2015 Ľ 2013 Ľ 2012 Ľ 2009 Ľ 2008 Ľ 2007 Ľ 2006 Ľ 2005 Ľ 2004 RSS Feeds Ľ FOV Factor Table Ľ Sensor Sizes | Definitions: A-D Ľ E-H Ľ I-L Ľ M-P Ľ Q-U Ľ V-Z | Sitemap Articles Ľ Archived Websites (Pre-DigitalDingus): D100 Lounge Ľ E-10 Club | Contact |