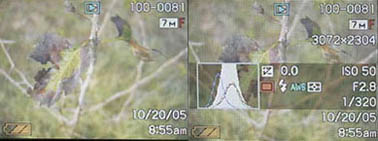
Reviewing your images is as quick and easy as pushing the play button above the LCD screen. Displaying images and scrolling through them is very quick, and you have three options for how much information is displayed. The first displays the image only, then with the file number, image size, quality, date, time, and battery status. The third option shows the image exposure information, shot settings, and histogram. You can also display multiple images at a time in a 3 by 3 grid by using the zoom lever to zoom out.
The LCD & Zooming
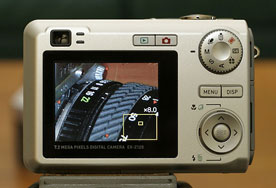 The Z-120 also has a useful zoom feature which allows you to zoom in 8x and scroll around the image, letting you check focus in your image. Once finished zooming in, you can press the Set button to quickly go back out to the normal viewing size of the image. The LCD isn't the biggest or the highest resolution, but it is still sharp enough to get a good idea of the sharpness of your images. I also found that using the LCD outdoors that it had enough brightness to still see the image. With the sun shining directly on it the image becomes lost, but shading the screen with just your hand is enough to be able to see it again.
Deleting Images
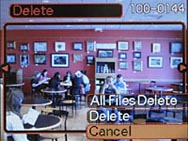 Deleting images is also a simple process that requires just enough button presses to keep you from accidentally deleting images without so many that it gets cumbersome. Pressing down on the 4 way jogger brings up the delete menu, and as you can see if you the default selected option is to cancel. So if you accidentally hit the Set key right after bring up the delete menu, you won't delete that image. Also, after deleting an image the menu remains active, but defaults back to Cancel being the selected option. Again this is a nice safety feature to keep from accidentally erasing images, while also saving some time by not having to bring up the delete menu after each image you delete.
Playback Menu
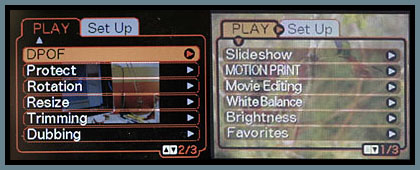 The Setup menu is the same in playback mode as it is in the other camera modes, which leaves only the Play menu. There are a number of options here, many with submenu's that allow you to modify images and videos you have shot. The Slideshow feature brings up a new menu (below), allowing you to select options such as which images to show, for how long to pause, and the transition effects. Motion Print is used to create a still image from a video file, though the resulting image will be in a low resolution. Movie Editing is for cutting parts of recorded movies out, White Balance allows you to change the white balance for an image that has already been shot, in case the wrong white balance was used during capture. A new image is created with the new white balance, leaving the original shot alone. This is an interesting feature in that the camera only shoots JPG files, which generally you wouldn't be able to simply change the white balance on after the image is shot. In my testing, the camera seems to do a decent job at changing the white balance while still keeping the colors of the image correct. However, it is still best to capture the image with the correct white balance from the start.
  Brightness allows you to adjust the exposure of captured images + 1, +2, -1, and -2. Similar to white balance, it is best to try and get the exposure correct when taking the photo, but unlike white balance the brightness of JPG's can be adjusted to an extent more easily without losing quality. Favorites allows you to set specific images to be saved into the Favorites folder in the built in memory. The full size image itself isn't saved, but a smaller copy of it is, so plan on only viewing these images on the camera if you use the Favorites feature. DPOF is used to print images directly from the camera, Protect will keep images from being deleted, though they can still be removed if you do a memory format, Rotate, Resize, and Trimming all do exactly what they say, and Dubbing allows you to add an audio message to an image, or to re-record an audio message that was already recorded. The final option (not shown) is Copy, which lets you copy images from the built in memory to an SD memory card and vice versa.