
 |
| Home Ģ Reviews Ģ Forums Ģ News 2015 Ģ 2013 Ģ 2012 Ģ 2009 Ģ 2008 Ģ 2007 Ģ 2006 Ģ 2005 Ģ 2004 RSS Feeds Ģ FOV Factor Table Ģ Sensor Sizes | Definitions: A-D Ģ E-H Ģ I-L Ģ M-P Ģ Q-U Ģ V-Z | Sitemap Articles Ģ Archived Websites (Pre-DigitalDingus): D100 Lounge Ģ E-10 Club | Contact |
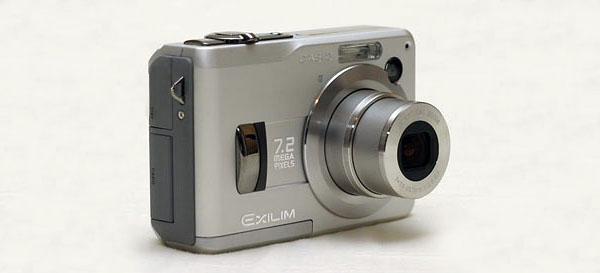
| Casio Exilim Zoom EX-Z120 (A DigitalDingus Member Review by Matt Chase) |
| Operation - Camera October 30, 2005 |
| Introduction Ģ Operation - Camera Ģ Operation - Menus Ģ Operation - Playback Photo Tests Ģ Comparison Images Ģ Sample Photos Specifications Ģ Conclusion
|
The Z-120 offers a number of different shooting modes to choose from, ranging from a very simple "Easy" mode, up to full manual control of aperture, shutter and more. This camera is designed to grow with you as you learn more about photography, making it a great choice for everyone from the casual point and shoot user to those wishing to be more creative with their photography. The camera has a built in 8mb of memory, enough for 1 high resolution photo, so plan on purchasing an SD card along with the camera. The card I have for testing with is a standard Sandisk 1gb SD card. With this card the camera shows I should get about 220 images at the highest resolution setting, or about 13 minutes of high quality video.
Powering on the camera is very quick, I timed it at just under 1.5 seconds from the time I pressed the power button until the camera was ready to take a photo. Focus speed is also fast, taking about .5 second under normal lighting, and the shutter release time is nearly instantaneous, it was too quick for me to time it. There is also a feature you can turn on and off which sets the camera to take a photo as soon as you press the shutter button, ignoring whether or not the camera has focused. This can be a nice feature for those unexpected photographic moments, but could also result in out of focus pictures. Easy Mode
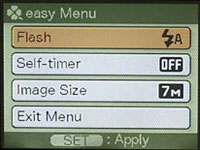
Setting the camera dial to the clover leaf icon puts the camera in Easy mode. This mode reduces the number of options you have for controlling the camera to a bare minimum, and also changes the menu system to the three options seen at left. The options you have in this mode are flash (auto, always on, off), self timer(10 seconds, off), image size (7m, 3m, VGA), and zoom. In regards to the image quality the camera switches to the normal compression setting when in Easy mode, meaning that your images may show some signs of compression. Usually there are three quality modes to choose from, Economy, Normal, and Fine, but unfortunately you can't change the quality to Fine when shooting in Easy mode. If you are only planning to share the photos online or make small prints, you probably won't notice a difference in the image quality. If you are planning on making larger prints or cropping into the images, you may need to use one of the other shooting modes order to raise the image quality setting. Snapshot Mode
Turning the dial to the red rectangle icon places the camera into Snapshot mode. This mode gives you access to almost all of the features of the camera, but is still designed to operate in a point and shoot manner. The LCD screen has three levels of information that it can display, the most basic being seen in the image to the right. From here, pressing Display will turn off the LCD, pressing it again adds the data seen in the first image below, and pressing Display once more adds the live histogram. You can also use the 4 way jogger to change the flash and focus settings. Pressing up will switch to Macro focus, pressing up again switches to infinity focus, again switches to manual focus, and once more brings you back to auto focus. Pressing down will set the flash to off, down again turns the flash to always on, again will set the flash to redeye reduction mode, and once more brings it back to the auto flash setting. Each of these changes is shown on the LCD with an icon as well as a text description, the icons will stay visible on the LCD except in the auto flash and auto focus modes. The macro focus lets you focus down to about 4", which will work for things such as business cards. But this isn't really close enough to fill the frame with anything really small, such as a quarter or your favorite bug. I also found that the flash was unable to expose correctly when focusing at 4", it was always too bright. So in most cases you will need to expose without the flash, using either daylight or a bright table lamp. In the center is the focus point box, which has the option of being single point or multi point focus (currently set to single point). The other icons visible are (clockwise from top center) the Snapshot mode icon, Metering mode (currently on multi, other options are center weighted and spot), images remaining, image size, quality setting (it is a bit hard to see, there is a red F representing Fine quality next to the 7m icon, other options are N(ormal) and E(conomy)), ISO speed (50, 100, 200, 400), date, time, battery level, and finally the histogram. If you have never used a histogram before, it is an important tool to learn that will help you take better photos. I will explain more about the histogram in the next section (playback). Best Shot Mode
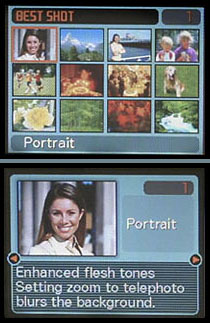
The Z-120 also has a Best Shot mode, with 32 preset options for such scenes as portraits, night shots, and sports. To enter this mode, you turn the dial to BS, and press the Set button to bring up the Best Shot options. From here you can scroll through the options in thumbnail mode (left), or use the zoom lever to switch to the single view mode (below). In the single view mode you will get a description of the setting, as well as a quick tip of how to make the best of photos in that mode. For example, the Portrait setting will set the cameras Sharpness setting to -1, helping to soften skin tones, and gives the tip that by zooming in you will blur the background, which helps emphasize your subject. You still have control over many of the features, such as turning the flash on or off, changing the focus mode, etc, but any changes you make while in Best Shot mode will not be remembered the next time you use the camera. Each of the Best Shot modes will always go back to their preset settings after the camera is turned off, so if you modify the settings of a Best Shot mode and want to keep those new settings, you will need to save them as a User Best Shot preset. Shutter Priority, Aperture Priority, and Full Manual Controls
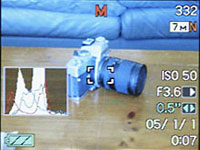
One of my favorite features of the Z-120 is that it offers not only the shutter and aperture priority modes, but also full manual control over all the exposure settings. I am a professional photographer, so for me buying a compact point and shoot camera is a challenge. I want something small and light which many cameras today are, but am fairly demanding on image quality and want as much control over the exposure as I can get. Many of the Z-120s competitors offer a small and light body with good image quality, but only have one mode - automatic. Not so with the Z-120. In the image to the right, you can see the M icon at the top center indicating manual mode, and under the ISO is your aperture, with your shutter speed below that. (Please forgive the incorrect date, I was too anxious to get started testing and forgot to set it when this capture was made). Using the left and right on the 4 way jogger allows you to raise or lower the exposure settings, and the Set button switches between aperture and shutter. The shutter setting is currently active in this image, indicated by the dull gray color instead of being white like the rest of the text. Pressing the Set button at this point would turn the aperture text gray indicating that you are setting the aperture, and the shutter text white would become white. This doesn't seem like the most intuitive display method to me, naturally our eyes go to the brightest object, which in this case is the white text. But it is the gray text that you are in control of and it is surrounded by brighter text, and I found myself thinking that I was controlling the opposite function on many occasions. This is something that I'm sure most will get used to with time, but little things like that still bother me. In the end, I am just happy to have the manual controls. |

| Home Ģ Reviews Ģ Forums Ģ News 2015 Ģ 2013 Ģ 2012 Ģ 2009 Ģ 2008 Ģ 2007 Ģ 2006 Ģ 2005 Ģ 2004 RSS Feeds Ģ FOV Factor Table Ģ Sensor Sizes | Definitions: A-D Ģ E-H Ģ I-L Ģ M-P Ģ Q-U Ģ V-Z | Sitemap Articles Ģ Archived Websites (Pre-DigitalDingus): D100 Lounge Ģ E-10 Club | Contact |